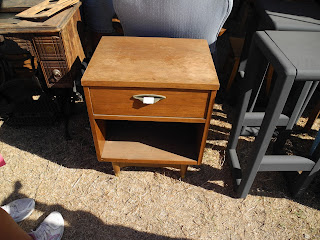
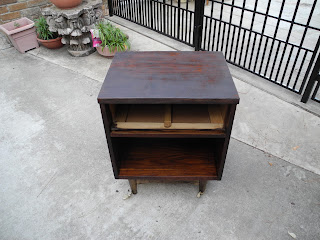
I needed a nightstand on the other side of my bed and this guy fit the bill. It was only $20 and I knew that I could make it shine (or I hoped so anyway). It really wasn't a terrible color to start off with but it was a little worse for wear, especially on the top so I had to change it up a bit. Here are some before shots:
See the worn out top?
It's just the perfect size, I had to make it sparkle. (Scratch that-sparkle sounds like a rare piece of jewelry or a my little pony. So not sparkle but at least look better than it did before.)
Next came the sanding. I don't know if I've really shared my aversion to sanding. I mean I love the finished product part, and the using a power tool part (because you just feel a little cooler than you semi know what your doing with a power tool). But the ACTUAL sanding part is definitely not my favorite. First of all, there's lots of dust, I mean ALOT. So much I think I actually got a cold from all of it the last time around. Note to self: Always protect your face when sanding or will cough, sneeze and feel miserable for days. So now I have a oh so chic pink bandana to not only make me look like the least intimidating robbery suspect but to make sure I don't inhale lots of dust from the sander. So sorry for that ranting, I'll get back to the table now.I started sanding this guy and realized that it was wood veneer and not real wood. Mwah wah... cue sad face. I should have checked it a little more when I bought it but I just got so excited and didn't quite inspect it like I should have. So I was sanding and did the best I could to get some stain off and make it as even as possible.
After I got to this stage, it was time for the staining process. I used the same brush on, wait 15 minutes, and wipe off process that I used on the coffee table with the Minwax Dark Walnut stain.
I started with the drawer just to make sure that I still liked the stain. That all went very smoothly and I was really happy with the result so I moved on to the table base. Side note: I removed the hardware and taped the bottom of the legs so to not get any stain on them. I also used my orbital sander to take off the initial coats of stain, which even on the veneer, worked pretty well. I used 80 grit at first, and then a 220 to smooth it all out.
It was at this point, I was still optimistic...and then... it turned into this.
It doesn't look quite as bad in the pictures as it did in person. I'm actually being a bit dramatic. The sides, inside, and drawer front came out perfectly. But the legs, crossbar and top sadly did not. It was a major bummer that the stain didn't cover very evenly and ended up being really dark on the top and legs were not quite the same color. After a minor panic moment, I re sanded the top and tried again. I was more concerned about that than the legs because they are more visible. (Picture to come) All I did for the legs was add a second coat and the color turned out a little more normal.
Here's a look at the legs before the second coat. It's not bad, just not the same color as the rest of the table.
Second coat!
I sanded the top and legs again, just a quick sand and re stained it and that seemed to do the trick. I buffed out the hardware, because it's so mod and cute I couldn't think of something better to replace it.
Here's the finished product. I added some frames just to give the picture some scale. It's exactly the right size and even after some minor problems, it really did turn out like I wanted.
The more I do this hopefully the better everything will look!
I have one or two more projects that I want to finish before it starts to get really cold outside. As much as I like doing this, if it's less than 50 degrees (and it does happen in Texas...occasionally) then my motivation to spend hours outside changing the appearance of my little projects pretty much goes down to zero. Hopefully I can get them done, otherwise, I'll have to start finding projects that are more easily achievable indoors.
Happy Friday!


